V2Ray+WebSocket+TLS+Web+Cloudflare教程
V2Ray+WebSocket+TLS+Web+Cloudflare教程
背景
一般来说,装好V2Ray之后就可以科学上网了,但是IP经常被封,固有此方案。
WebSocket+TLS+Web的组合怎么来的?这个组合意思是,在机器上部署一个web站点,使用 Nginx/Caddy/Apache 可以将 V2Ray 稍作隐藏。使用 WebSocket 是因为搭配 Nginx/Caddy/Apache 只能用 WebSocket,使用 TLS 是因为可以流量加密,看起来更像 HTTPS。也就是说,我们的机器看起来是个正常的网站,当访问特定的path,可以把流量转发给V2Ray。
Cloudflare是一个CDN,可以代理所有的流量,同时隐藏真实的IP,这样IP被封的几率就小了。
准备
- 用来科学上网的VPS机器,可以SSH登录
- 一个域名,我使用的是阿里云的,4块一年,到期了再换,买便宜的就行。本文以
mydomain.com域名作为演示。
下面开始。建议先通读全文,理解每一步在做什么,不要立即动手,照着命令一顿敲。
1 安装v2ray
如果已经装好了v2ray且能通过ip正常使用,跳过这一步
官方文档:fhs-install-v2ray/README.zh-Hans-CN.md at master · v2fly/fhs-install-v2ray (github.com)
sudo su切换到root用户,执行:
| |
配置服务端
位于/usr/local/etc/v2ray/config.json
| |
上面的用户ID是UUID,可以理解为密码,请修改为自己的,这里可以在线生成:Online UUID Generator Tool
启动V2Ray
sudo systemctl restart v2ray.service
配置Windows客户端
在这里下载:2dust/v2rayN: A V2Ray client for Windows, support Xray core and v2fly core (github.com)。安装后[添加VMess服务器],核心字段就是VPS的ip、端口、用户ID:(这里也能生成ID,与服务端配置保持一致即可)
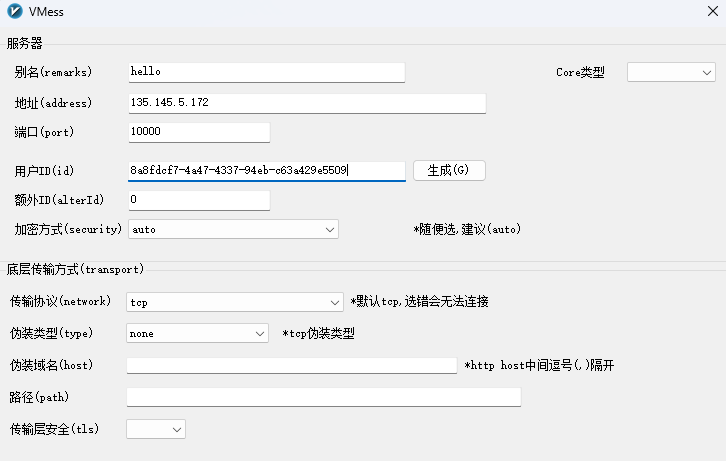
然后试用一下能不能上谷歌,可以的话说明V2Ray安装正确,进入下一步。
2 部署一个Web站点
安装Nginx:
sudo apt install nginx
新建站点目录:
cd /var/www
sudo mkdir mydomain.com
然后在该目录下放一个静态页面,内容随便(可以去github找些静态网站放在这个目录):
cd mydomain.com
sudo echo “hello” > index.html
配置virtual host:
cd /etc/nginx/sites-available
touch mydomain.com
vim mydomain.com,内容如下:
| |
然后将默认配置文件改为刚刚创建的站点配置文件:
cd /etc/nginx/sites-enabled
sudo ln -s /etc/nginx/sites-available/mydomain.com default
重启Nginx:
sudo systemctl restart nginx.service
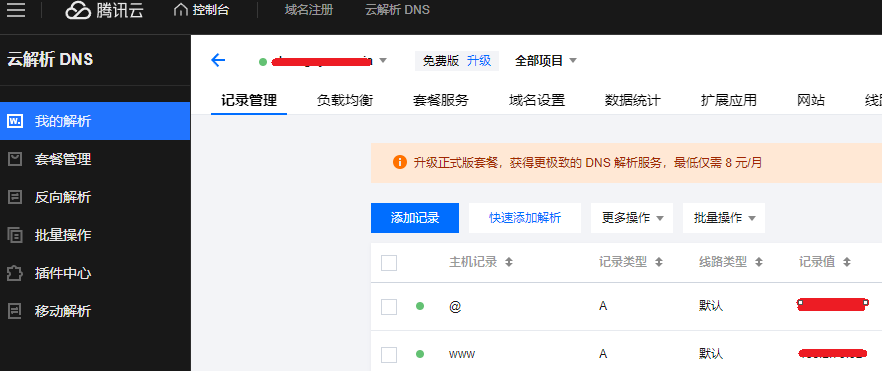
3 设置域名解析
登录阿里云控制台,进入域名列表,为自己的域名设置解析记录:添加一条A记录,让该域名指向你的VPS机器的ip。然后验证能否通过域名访问自己的web站点。在浏览器输入http://mydomain.com,如果不能访问,检查VPS的防火墙是否放开了80端口。
腾讯云截图:
 、(当后面使用CloudFlare的DNS服务器时,就可以不在这里设置解析记录了,而是在CloudFlare那边设置)。
4 给Web站点安装TLS证书
按照certbot的指南操作:
| |
贴一下我的安装日志:
1 2 3 4 5 6 7 8 9 10 11 12 13 14 15 16 17 18 19 20 21 22 23 24 25 26 27 28 29 30 31 32 33 34 35 36 37 38 39ubuntu@instance-3c23g-220418:~$ sudo certbot --nginx Saving debug log to /var/log/letsencrypt/letsencrypt.log Which names would you like to activate HTTPS for? We recommend selecting either all domains, or all domains in a VirtualHost/server block. - - - - - - - - - - - - - - - - - - - - - - - - - - - - - - - - - - - - - - - - 1: mydomain.com - - - - - - - - - - - - - - - - - - - - - - - - - - - - - - - - - - - - - - - - Select the appropriate numbers separated by commas and/or spaces, or leave input blank to select all options shown (Enter 'c' to cancel): Certificate not yet due for renewal You have an existing certificate that has exactly the same domains or certificate name you requested and isn't close to expiry. (ref: /etc/letsencrypt/renewal/mydomain.com.conf) What would you like to do? - - - - - - - - - - - - - - - - - - - - - - - - - - - - - - - - - - - - - - - - 1: Attempt to reinstall this existing certificate 2: Renew & replace the certificate (may be subject to CA rate limits) - - - - - - - - - - - - - - - - - - - - - - - - - - - - - - - - - - - - - - - - Select the appropriate number [1-2] then [enter] (press 'c' to cancel): 2 Renewing an existing certificate for mydomain.com Successfully received certificate. Certificate is saved at: /etc/letsencrypt/live/mydomain.com/fullchain.pem Key is saved at: /etc/letsencrypt/live/mydomain.com/privkey.pem This certificate expires on 2024-01-22. These files will be updated when the certificate renews. Certbot has set up a scheduled task to automatically renew this certificate in the background. Deploying certificate Successfully deployed certificate for mydomain.com to /etc/nginx/sites-enabled/default Your existing certificate has been successfully renewed, and the new certificate has been installed. - - - - - - - - - - - - - - - - - - - - - - - - - - - - - - - - - - - - - - - - If you like Certbot, please consider supporting our work by: * Donating to ISRG / Let's Encrypt: https://letsencrypt.org/donate * Donating to EFF: https://eff.org/donate-le - - - - - - - - - - - - - - - - - - - - - - - - - - - - - - - - - - - - - - - -如上所述,Certbot提到,它设置了定时任务,会定期更新证书。这个定时任务不在crontable里面,在
systemctl list-timers里:
1
2
3
4
ubuntu@instance-3c23g-220418:/etc/nginx/sites-available$ systemctl list-timers NEXT LEFT LAST PASSED UNIT ACTIVATES Tue 2023-10-24 02:18:55 UTC 28min left Mon 2023-10-23 12:07:04 UTC 13h ago apt-daily.timer apt-daily.service Tue 2023-10-24 04:14:00 UTC 2h 24min left Mon 2023-10-23 15:56:01 UTC 9h ago snap.certbot.renew.timer snap.certbot.renew.service
证书装好了之后,再看Nginx的配置文件,发现里面多了一些内容:
cd /etc/nginx/sites-enabled
cat default:(这个default是指向mydomain.com文件的)
| |
可见,以managed by Certbot注释结尾的就是certbot添加的内容。配置的意思是,监听443端口,如果通过80端口访问,则重定向到443。也就是说,现在在浏览器访问http://mydomain.com,将会被重定向到https://mydomain.com。
重启nginx服务,添加防火墙规则放行443端口。若浏览器可以访问https://mydomain.com,说明证书无问题,进入下一步。
5 Nginx分流
现在流量全都去自己的Web网站了,科学上网怎么办?设置Nginx的path,将特定path的流量转发到V2Ray服务:
修改Nginx配置
cd /etc/nginx/sites-enabled
sudo vim default (这个default是指向mydomain.com文件的)
将下面这段内容,添加到监听443端口的server里面:
| |
上述配置的意思是,当访问https://mydomain.com/login时,将其转发到10000端口,而10000端口就是V2Ray服务的监听端口。
login可以随便写,使用login是为了让这个网站看起来更加“正常”。虽然TLS会加密URL path。
添加后的效果为:
| |
修改V2Ray配置
sudo vim /usr/local/etc/v2ray/config.json
| |
可见,是在原来的基础上,添加了如下配置:
| |
重启Nginx和v2ray服务。
修改v2ray客户端配置
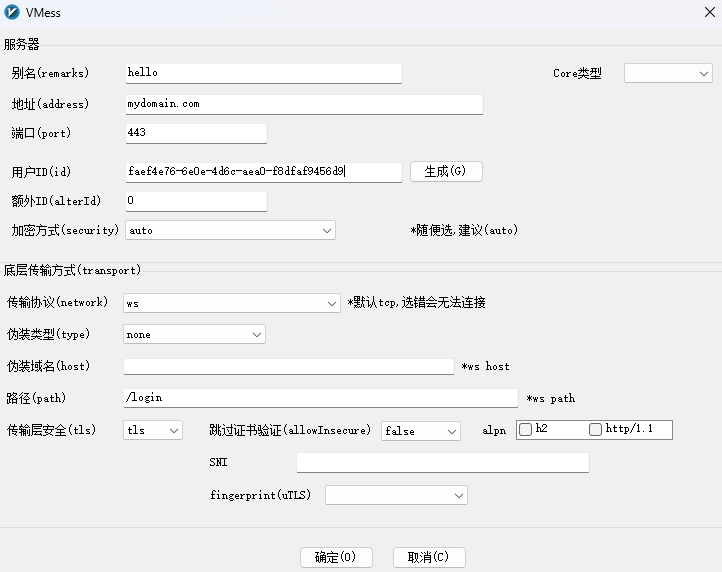
与最开始的配置相比,有以下几点变化:
- 地址:之前是VPS机器的IP,变为域名了
- 端口:之前直接写的v2ray服务端的端口,现在是443端口
- 传输协议:之前是TCP,现在是WebSocket(ws)
- 然后有一个路径:login
- 传输安全性:之前没有,现在是TLS
改了客户端配置后,再试一下能不能访问谷歌,如果一些顺利的话,进入下一步。
6 使用Cloudflare隐藏IP
到前面为止,虽然我们配置了使用域名来访问v2ray,但是阿里云的DNS解析服务依然受监管,依然知道我们的流量最终去到了哪个IP。如果我们的流量比较异常,还是会被揪出来,IP还是会被封。因此,可以使用Cloudflare的DNS服务器,增加一层保护,稳一点是一点。
cloudflare 是一家国外的 CDN 加速服务商,注册之后,添加站点,输入你的域名mydomain.com。
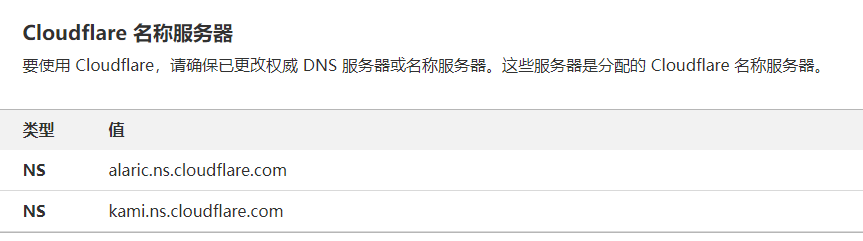
更换DNS服务器
然后为域名添加DNS记录:

然后登录阿里云控制台,域名列表-管理,将DNS服务器改为cloudflare的DNS服务器:
这是阿里云默认的:
这是cloudflare的:
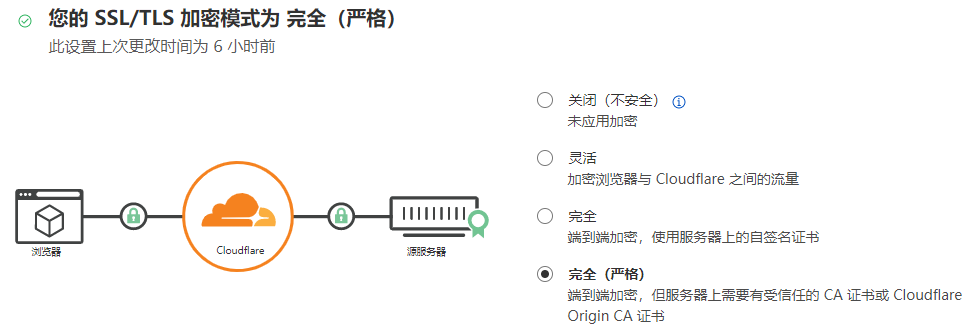
配置加密模式
然后进入cloudflare-SSL/TLS,将加密模式设置为完全(严格):
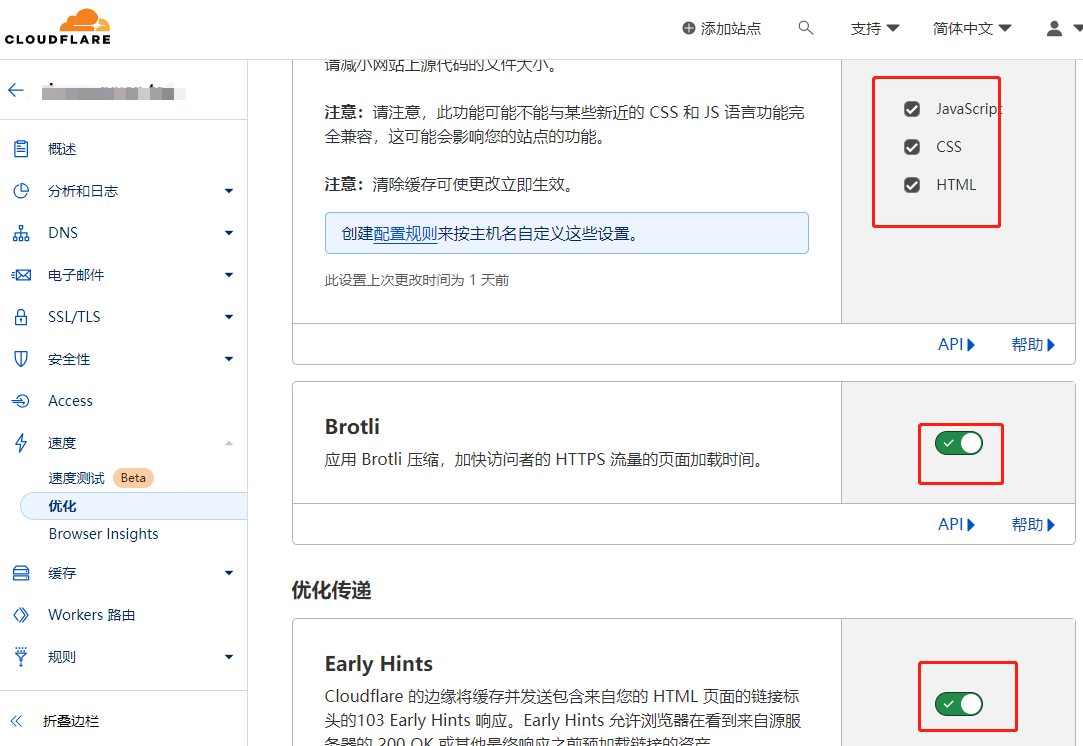
速度优化
然后在速度-优化中,把这些都勾上:
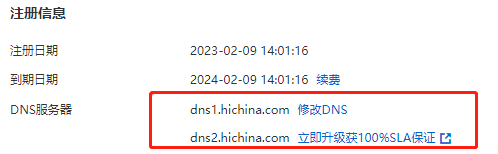
7 更新域名
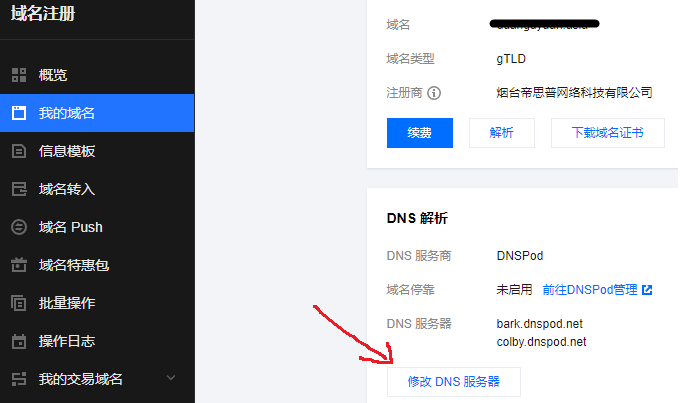
域名都是几块钱一年的便宜域名,到期后如何修改?以腾讯云为例
腾讯云-域名注册-我的域名,修改DNS服务器,改为CloudFlare提供的名称服务器:
按照前文第6节,在CloudFlare设置一遍
登陆vps,修改nginx配置和证书
编辑/etc/nginx/sites-enabled/default,全局替换,将里面的域名改为新的域名。注意不要存放web文件的目录不要改了,也就是这一行:
1root /var/www/mydomain.top;如果你改了mydomain.top,请同步去/var/www/目录下修改目录名。
然后删除所有证书相关的配置,也就是以
managed by Certbot结尾的行,保存。然后运行以下命令再次生成证书,参考前文第4节:
1sudo certbot --nginx然后编辑/etc/nginx/sites-enabled/default,删除里面一些多余的行。
最后重启nginx即可。
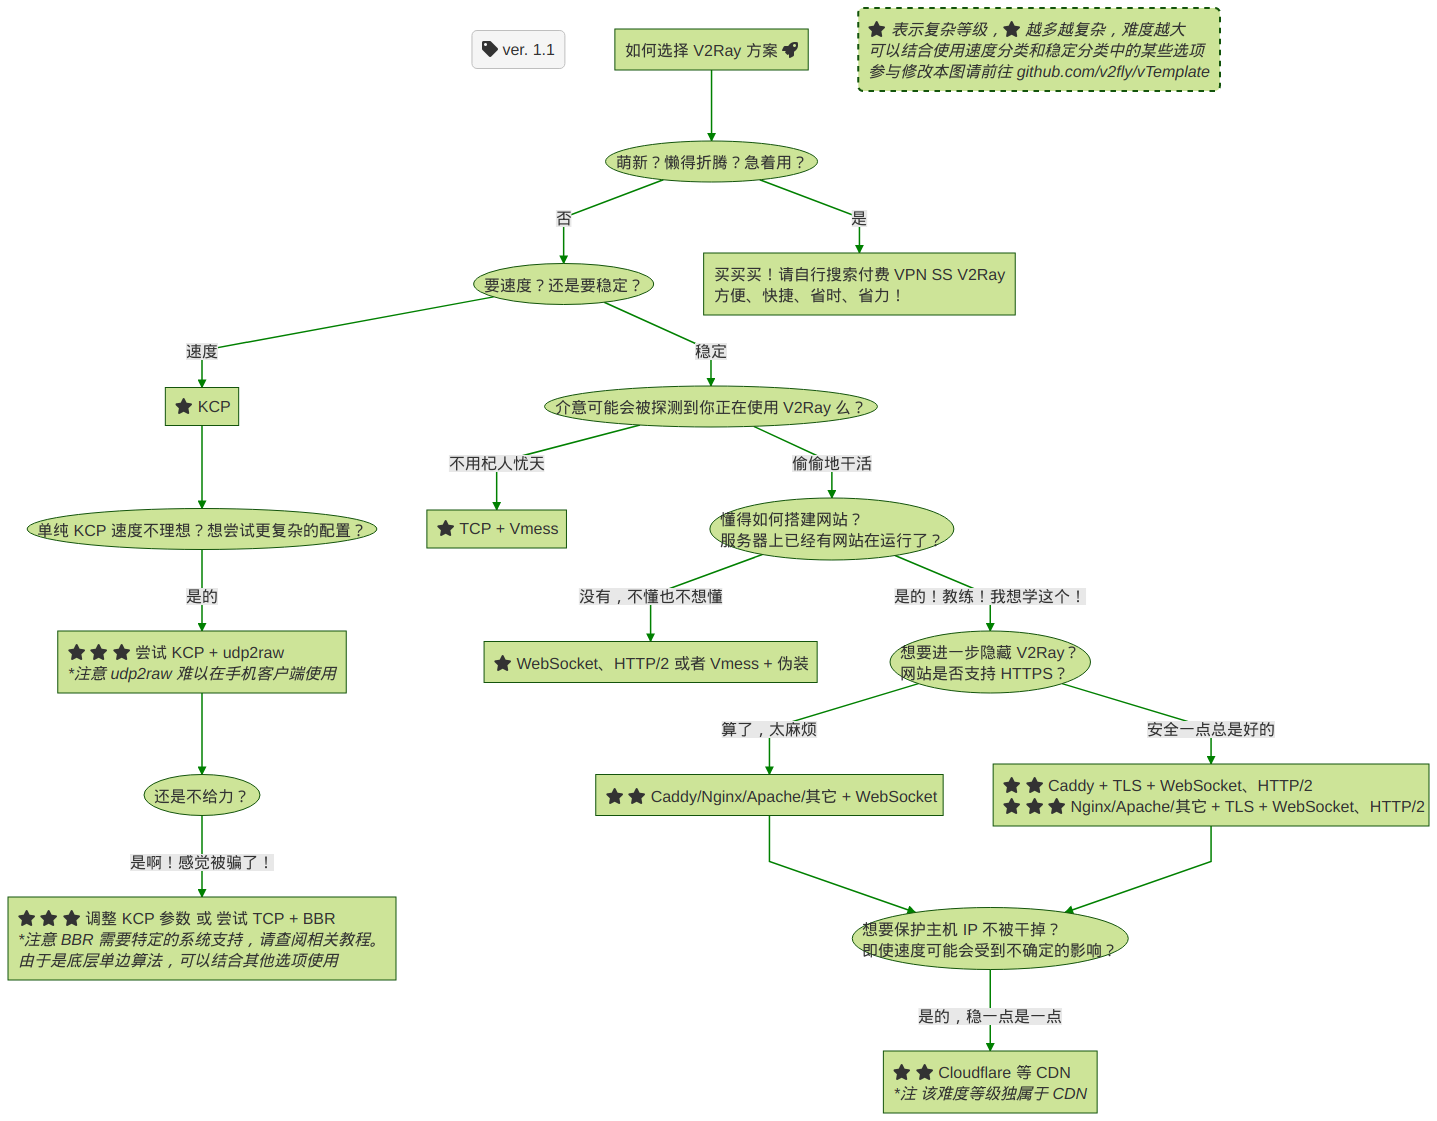
8 总结
本文走的右边这条路线:
Reference
- TLS | 新 V2Ray 白话文指南 (v2fly.org)
- WebSocket + TLS + Web | 新 V2Ray 白话文指南 (v2fly.org)
- v2fly/v2ray-examples: v2ray-core 的模板们 (github.com)
- v2ray使用cloudflare中转流量,拯救被墙ip - VPS攻略 (vpsgongyi.com)