所有的教程都不如官网。
官网
官网:V2Fly.org
github:v2fly/v2ray-core: A platform for building proxies to bypass network restrictions. (github.com)
以下是旧的官网和github:
注意,旧版本的安装脚本已废弃。
安装
使用Linux安装脚本:
v2fly/fhs-install-v2ray: Bash script for installing V2Ray in Linux that support systemd (github.com)
该脚本在运行时会提供 info 和 error 等信息,请仔细阅读。
安装和更新 V2Ray
1
2
| // 安装可执行文件和 .dat 数据文件
# bash <(curl -L https://raw.githubusercontent.com/v2fly/fhs-install-v2ray/master/install-release.sh)
|
安装最新发行的 geoip.dat 和 geosite.dat
1
2
| // 只更新 .dat 数据文件
# bash <(curl -L https://raw.githubusercontent.com/v2fly/fhs-install-v2ray/master/install-dat-release.sh)
|
移除 V2Ray
1
| # bash <(curl -L https://raw.githubusercontent.com/v2fly/fhs-install-v2ray/master/install-release.sh) --remove
|
我的安装日志:
 1
 2
 3
 4
 5
 6
 7
 8
 9
10
11
12
13
14
15
16
17
18
19
20
21
22
23
24
25
26
27
28
29
30
31
32
33
34
35
36
37
38
39
40
41
42
43
44
45
46
47
48
49
50
51
52
53
54
55
56
57
58
59
60
61
62
63
64
| # 先切换到root
$ sudo su
# 执行
root@ubuntu:~# bash <(curl -L https://raw.githubusercontent.com/v2fly/fhs-install-v2ray/master/install-release.sh)
% Total % Received % Xferd Average Speed Time Time Time Current
Dload Upload Total Spent Left Speed
100 21647 100 21647 0 0 1321k 0 --:--:-- --:--:-- --:--:-- 1321k
info: Installing V2Ray v4.44.0 for aarch64
Downloading V2Ray archive: https://github.com/v2fly/v2ray-core/releases/download/v4.44.0/v2ray-linux-arm64-v8a.zip
% Total % Received % Xferd Average Speed Time Time Time Current
Dload Upload Total Spent Left Speed
100 664 100 664 0 0 2055 0 --:--:-- --:--:-- --:--:-- 2055
100 12.4M 100 12.4M 0 0 3138k 0 0:00:04 0:00:04 --:--:-- 4019k
Downloading verification file for V2Ray archive: https://github.com/v2fly/v2ray-core/releases/download/v4.44.0/v2ray-linux-arm64-v8a.zip.dgst
info: Extract the V2Ray package to /tmp/tmp.A891dl5AVC and prepare it for installation.
info: Systemd service files have been installed successfully!
warning: The following are the actual parameters for the v2ray service startup.
warning: Please make sure the configuration file path is correctly set.
# /etc/systemd/system/v2ray.service
[Unit]
Description=V2Ray Service
Documentation=https://www.v2fly.org/
After=network.target nss-lookup.target
[Service]
User=nobody
CapabilityBoundingSet=CAP_NET_ADMIN CAP_NET_BIND_SERVICE
AmbientCapabilities=CAP_NET_ADMIN CAP_NET_BIND_SERVICE
NoNewPrivileges=true
ExecStart=/usr/local/bin/v2ray -config /usr/local/etc/v2ray/config.json
Restart=on-failure
RestartPreventExitStatus=23
[Install]
WantedBy=multi-user.target
# /etc/systemd/system/v2ray.service.d/10-donot_touch_single_conf.conf
# In case you have a good reason to do so, duplicate this file in the same directory and make your customizes there.
# Or all changes you made will be lost! # Refer: https://www.freedesktop.org/software/systemd/man/systemd.unit.html
[Service]
ExecStart=
ExecStart=/usr/local/bin/v2ray -config /usr/local/etc/v2ray/config.json
installed: /usr/local/bin/v2ray
installed: /usr/local/bin/v2ctl
installed: /usr/local/share/v2ray/geoip.dat
installed: /usr/local/share/v2ray/geosite.dat
installed: /usr/local/etc/v2ray/config.json
installed: /var/log/v2ray/
installed: /var/log/v2ray/access.log
installed: /var/log/v2ray/error.log
installed: /etc/systemd/system/v2ray.service
installed: /etc/systemd/system/v2ray@.service
removed: /tmp/tmp.A891dl5AVC
info: V2Ray v4.44.0 is installed.
You may need to execute a command to remove dependent software: apt purge curl unzip
Please execute the command: systemctl enable v2ray; systemctl start v2ray
root@instance-20220307-2119:/home/ubuntu/v2ray# systemctl status v2ray
● v2ray.service - V2Ray Service
Loaded: loaded (/etc/systemd/system/v2ray.service; disabled; vendor preset: enabled)
Drop-In: /etc/systemd/system/v2ray.service.d
└─10-donot_touch_single_conf.conf
Active: inactive (dead)
Docs: https://www.v2fly.org/
|
配置
官方给了模板:v2fly/v2ray-examples: v2ray-core 的模板们 (github.com)
如果想了解更多,还有一份详细文档:V2Ray 配置指南 | 新 V2Ray 白话文指南 (v2fly.org)
一份简单的配置
来源:VMess | 新 V2Ray 白话文指南 (v2fly.org)
服务端配置
配置文件位于/usr/local/etc/v2ray/config.json
 1
 2
 3
 4
 5
 6
 7
 8
 9
10
11
12
13
14
15
16
17
18
19
20
21
22
23
| {
"inbounds": [
{
"port": 16823, // 服务器监听端口
"protocol": "vmess", // 主传入协议
"settings": {
"clients": [
{
"id": "b831381d-6324-4d53-ad4f-8cda48b30811", // 用户 ID,客户端与服务器必须相同
"alterId": 0 // 新版本不能设置为64
}
]
}
}
],
"outbounds": [
{
"protocol": "freedom", // 主传出协议
"settings": {}
}
]
}
|
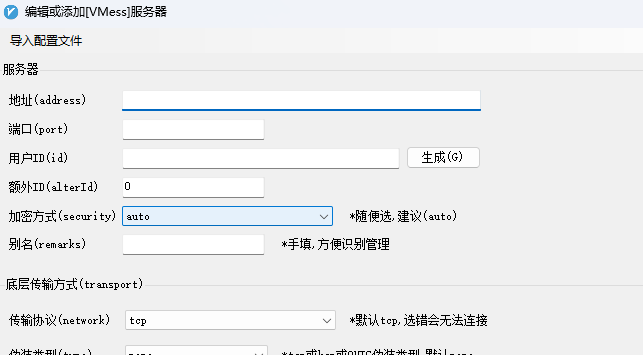
客户端配置
例如,在Windows上使用v2rayN,服务器->添加VMess服务器,可以手动填写各项,也可以导入配置文件。
 1
 2
 3
 4
 5
 6
 7
 8
 9
10
11
12
13
14
15
16
17
18
19
20
21
22
23
24
25
26
27
28
29
30
31
32
33
34
| {
"inbounds": [
{
"port": 1080, // 监听端口
"protocol": "socks", // 入口协议为 SOCKS 5
"sniffing": {
"enabled": true,
"destOverride": ["http", "tls"]
},
"settings": {
"auth": "noauth" //socks的认证设置,noauth 代表不认证,由于 socks 通常在客户端使用,所以这里不认证
}
}
],
"outbounds": [
{
"protocol": "vmess", // 出口协议
"settings": {
"vnext": [
{
"address": "serveraddr.com", // 服务器地址,请修改为你自己的服务器 IP 或域名
"port": 16823, // 服务器端口
"users": [
{
"id": "b831381d-6324-4d53-ad4f-8cda48b30811", // 用户 ID,必须与服务器端配置相同
"alterId": 0 // 此处的值也应当与服务器相同
}
]
}
]
}
}
]
}
|
如何生成 UUID
在线生成器:Online UUID Generator Tool
Linux 命令生成:cat /proc/sys/kernel/random/uuid
版本
对于“变体(variants)1”和“变体2”,标准中定义了五个版本(versions),并且在特定用例中每个版本可能比其他版本更合适。
版本由 M 字符串中指示。
版本1 - UUID 是根据时间和 节点ID(通常是MAC地址)生成;
版本2 - UUID是根据标识符(通常是组或用户ID)、时间和节点ID生成;
版本3、版本5 - 确定性UUID 通过散列(hashing)名字空间(namespace)标识符和名称生成;
版本4 - UUID 使用随机性或伪随机性生成。
—— 来源:通用唯一识别码 - 维基百科,自由的百科全书 (wikipedia.org)
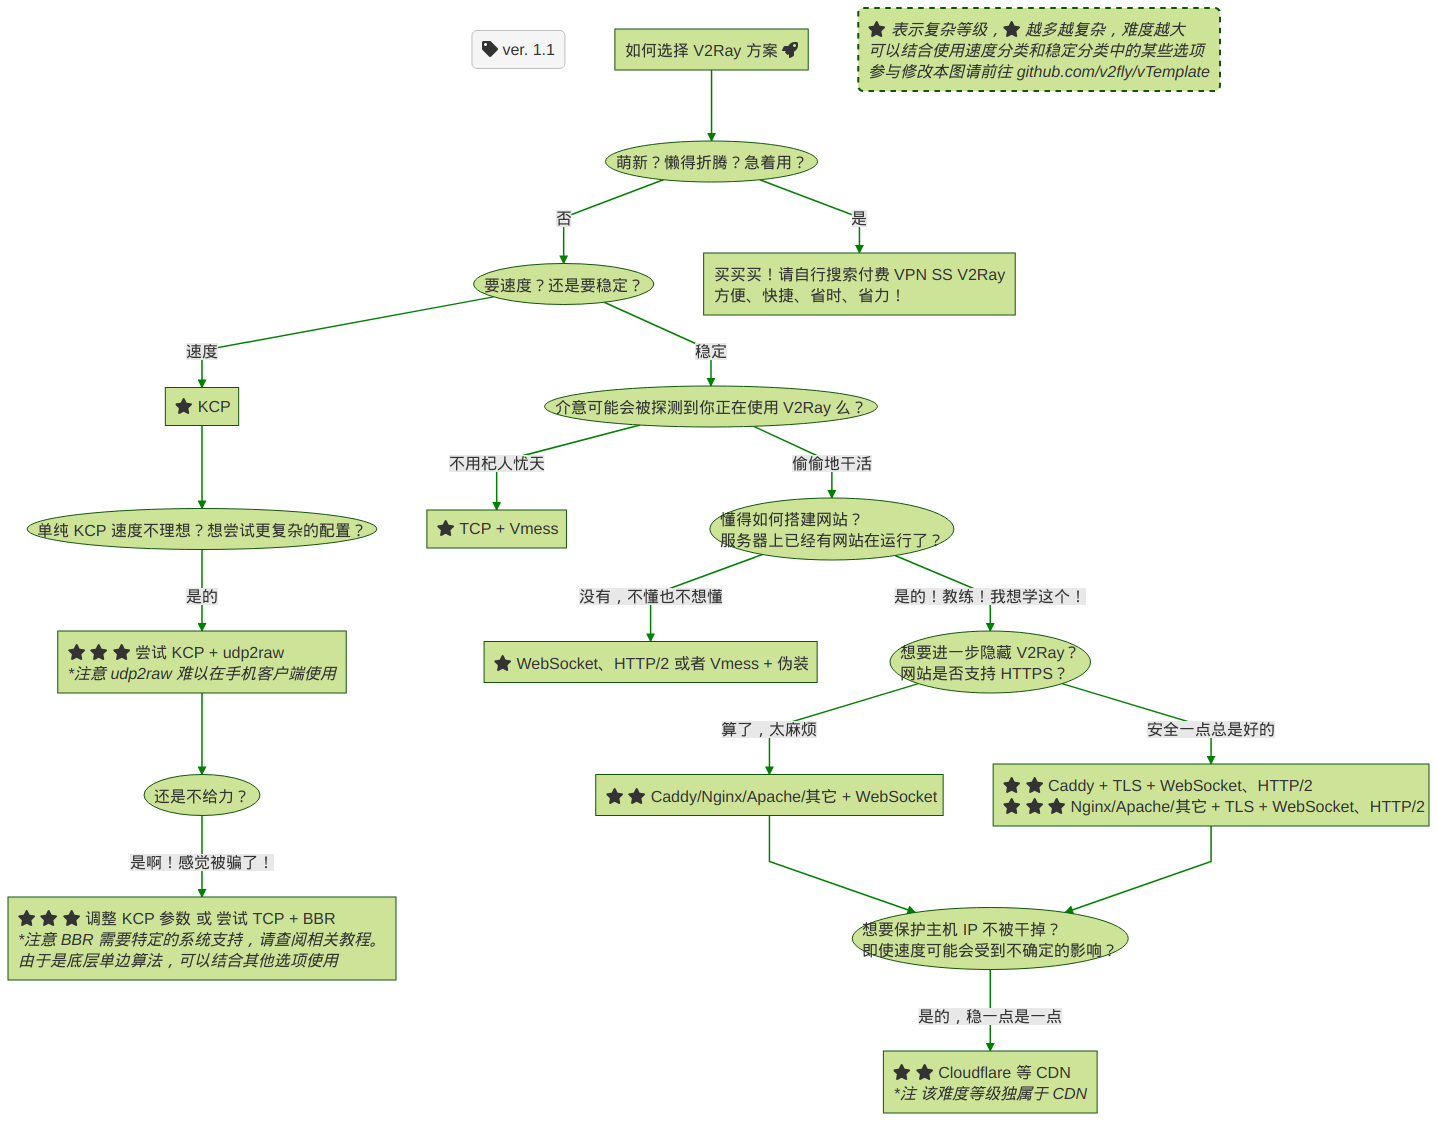
如何选择配置方案
官方的这个图真的太皮了,特意拿过来:
运行
1
| sudo systemctl start v2ray
|
开机自启:
1
2
| sudo systemctl enable v2ray.service
Created symlink /etc/systemd/system/multi-user.target.wants/v2ray.service → /etc/systemd/system/v2ray.service.
|